![[New] Streamlining Social Interaction via Multi-View Broadcasting in Facebook](https://thmb.techidaily.com/dfd36bdece1f9de4c3b950ac0cec685d6ee5d1281721c2dd1a2340c4240b4f62.png)
"[New] Streamlining Social Interaction via Multi-View Broadcasting in Facebook"
Streamlining Social Interaction via Multi-View Broadcasting in Facebook
Everything About Facebook Live Split Screen You Should Know

Shanoon Cox
Mar 27, 2024• Proven solutions
Facebook live split-screen is no more new to many of you. In this large list of advanced features, Live Split Screen was one of the most interesting additions and has been gaining popularity. It allows users to share two or more than two videos at once on a single screen and the best part is that their audio can be customized in an entertaining way. If you are new to the split-screen concept then here are few interesting things to know, keep reading.
- Definition of Facebook Live Split Screen Stream
- Split Screen Requirements
- How to set up Facebook Live Split Screen
- How to Make Split-Screen Video with Wondershare Filmora and Upload to Facebook
What is Facebook Live Split Screen Stream?
Facebook Live feature is activated now and probably you might have planned lots of stuff to stream here directly. That’s great! It will help you to call your friends live chat and you will also be able to organize business meetings over here. Wow! It is really going to revolutionize digital media. Now we can conduct employee meetings with Facebook live chat or even interviews can be scheduled over here. This tool has so many applications and the awesomeness of results depends upon your creativity.
Split Screen Requirements
Let us discuss the requirements of the split-screen feature. Till now users were able to simply upload videos online and the audience uses to comment over that as per their reactions for the content. But now it is possible to update your current live moments interactively on Facebook so that every viewer can stay engaged with your creative stream. Further, it assists users to share the live screen with someone else over the network. But note that, this feature is currently compatible with iPhone only, no other device can enjoy these live-streamed moments. Probably, android users need to wait for few months to avail of this opportunity. So, if you are ready with your device and know very well about data that you are going to update online then follow the guidelines below:
How to Set Up Facebook Live Split Screen?
If you want to entertain your audience with quality live split content then follow these steps below:
Step 1: First of all you have to open the Facebook application on your iPad or iPhone.
Step 2: Go to the news feed page and that hit the live button over there. This live button is indicated as “What is in Your Mind”.
Step 3: Now update an eye-catching description for your video, it must be engaging enough for users so that they can spend time for your content.
Step 4: Hit the “Go Live” option and your stream will immediately begin online.
Step 5: As soon as your stream is live, you will be able to swipe over it to get different controls at ease. Simply swipe left and it will take you to the viewers count.
Step 6: If you want to add someone else to your split screen video then use the Invite to Go Live button on the screen.
Step 7: Once you are done with your valuable information or entertainment then you can remove the stream from the internet. You can simply use Cross sign to remove your viewers from a stream.
How to Make Split-Screen Video with Wondershare Filmora and Upload to Facebook
 Download Mac Version ](https://tools.techidaily.com/wondershare/filmora/download/ )
Technologies have revolutionized these days and now streaming is not bound to one person only rather you can invite your friend on the same stream and share screen with a split-screen option. This Live Split Screen Feature has been recently added to the Facebook platform and it enabled two-person broadcast features even from remote locations. After Live is ended, you can choose to post your video so more people can watch it. But how to create a split-screen video and upload it to Facebook without the Live Split-Screen feature? In the following section, we will show you everything you need to complete a split-screen video and upload it to Facebook directly.
How to Make Split-Screen Videos?
Those who are interested to create a surprising stunning video clip for their Facebook friends are advised to use Filmora Split Screen Video Editor . This application is compatible with Mac as well as Windows platform and follows a user-friendly interface. It offers a wide range of video editing features and results can be customized using transitions or by adding background music effects. The resulting video files can be directly uploaded to Facebook with the desired file format. You will be glad to know that Wondershare Filmora extends support to more than 150 media file formats along with high-resolution video content.
Here are simple steps for creating split-screen videos:
Step 1. Download Wondershare Filmora
First of all, you need to go online and download Filmora Split Screen Video Editor from its official website. Get it installed and launch on your platform. As soon as the software gets started on your system, simply make selections for the desired aspect ratio for your project. Now from the welcome window, make a selection for full feature mode.
Step 2. Import Video
There are two options to import video files to Wondershare Timeline. You can either access them by pressing the Import button from the timeline that helps to bring files directly to the User’s Album. Or the second option is the user-friendly ‘drag and drop’ tools that make everything easier for a beginner.
Step 3. Select Split Screen Preset
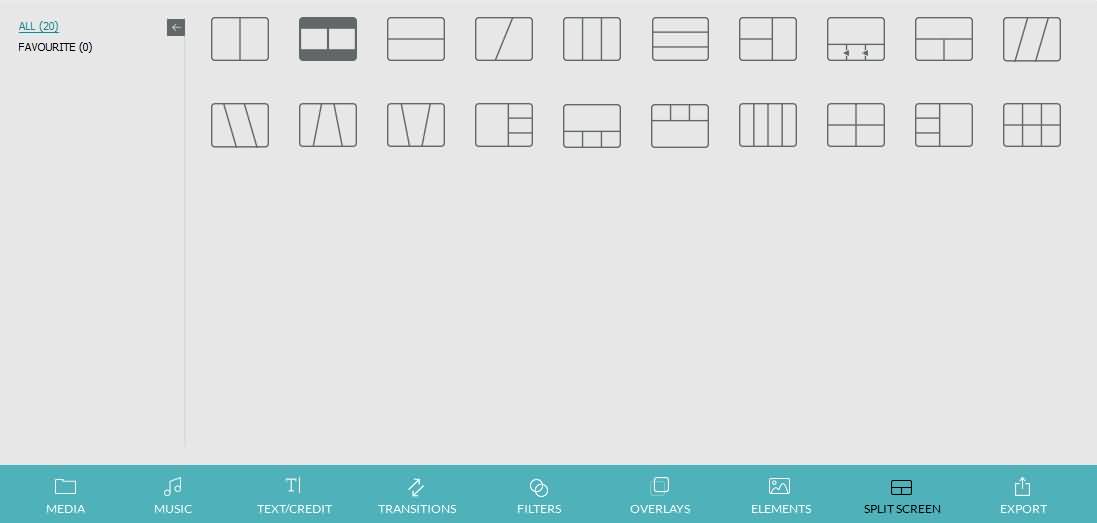
You will find the Split Screen button on Wondershare Toolbar. Select this option and it will soon lead you to the library containing numbers of split-screen formats. Out of this big list, you can choose anyone and then drag it to a timeline. If you don’t want to use drag and drop tool then select your present, right-click over it, and then from the drop-down menu select the Apply option. One more option is to choose your present type and then hit the Plus icon available on the lower right portion of the thumbnail.
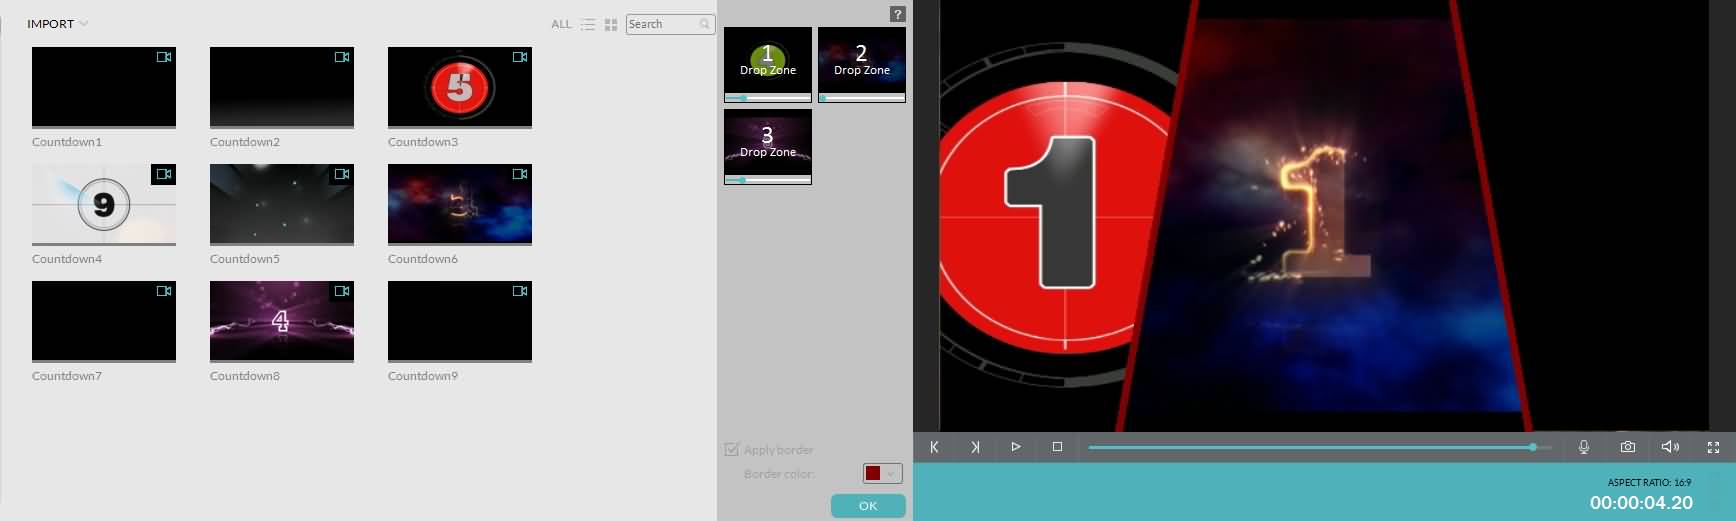
Step 4. Add videos to Split Screen
Go to the timeline and double click on your recently selected preset. You will find drop zones on your timeline to which videos can be added. Simply drag your video files and drop them in different drop zones as the available one box contains a slider for time adjustments of various videos, users can access it to apply desired timing constraints. One can also add borders to videos from the “Apply Border” option and the best part is that the colors of these borders can be also customized to create unique effects.
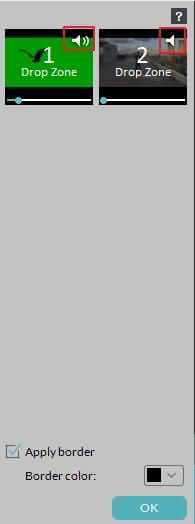
Step 5. Video Sound Adjustment
Now as you have added all videos to your split screen, they will naturally start playing at the same time and their audio information will appear like noise. Here you need to apply some trick for sound adjustment so that viewers do not find your content annoying. The best advice is to mute one video at a time and let another play normally. In order to mute a video file, you can simply hit the Mute Track option from Drop Zone. Users can also mute both these videos and add one separate informative file in form of a soundtrack to the split-screen video. You can find such soundtrack files in the built-in media library of Wondershare. Once all soundtrack adjustments are done then hit the OK button to save the changes.
Step 6. Upload Split Screen Video to Facebook
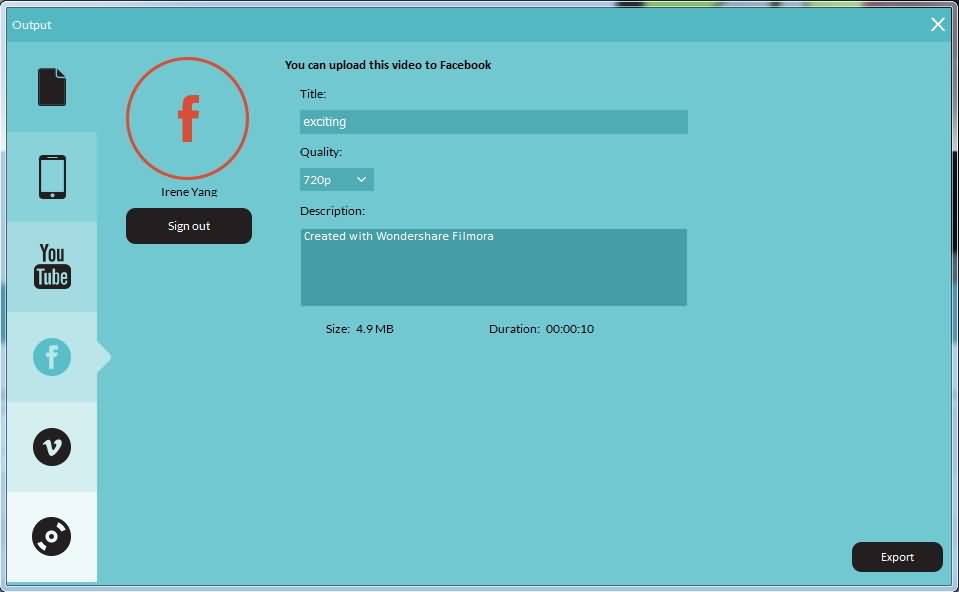
As you are done with all the changes now so it is time to impress your audience. Hit the export button on the Wondershare platform and select the file format for your split-screen video. Use Facebook sign for selection of upload platform and sign in with your account. Add a description and title information and finally hit the Export button.
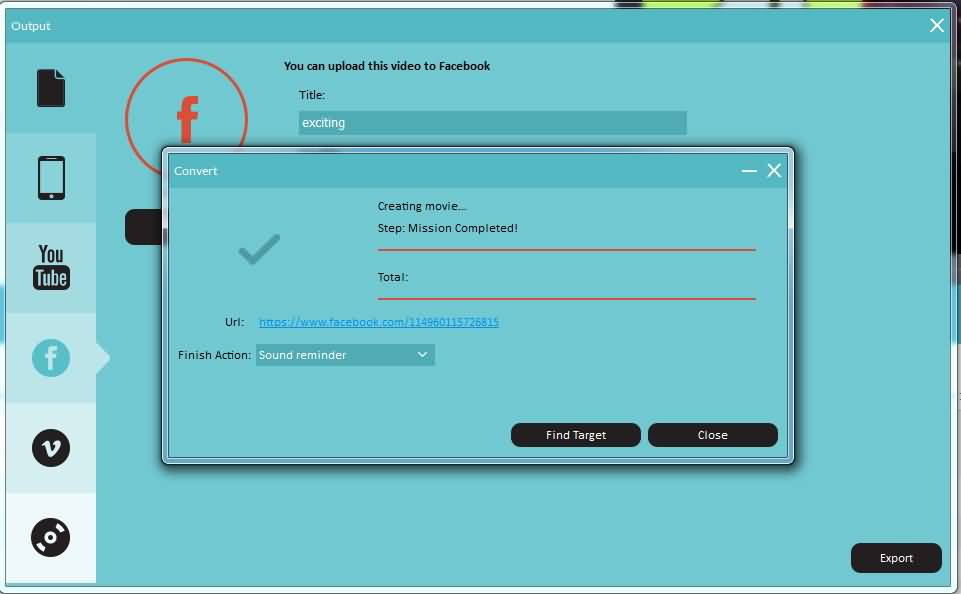
After the export process is finished, you can click the link or click the Find Target button to check your split-screen video on Facebook.
Or, you can save the video in .mp4 format first and then upload it to your Facebook later. To do so, click the first icon and then select the .mp4 format.
What’s more, you can export the split-screen video to your smartphone or burn it to a DVD collection, or upload it to YouTube and Vimeo.

You may also like: 8 Best Facebook Scheduler>>
How to Create Square Videos for Facebook >>
Facebook Insights: How to Use it for Beginners >>
Shanoon Cox
Shanoon Cox is a writer and a lover of all things video.
Follow @Shanoon Cox
Shanoon Cox
Mar 27, 2024• Proven solutions
Facebook live split-screen is no more new to many of you. In this large list of advanced features, Live Split Screen was one of the most interesting additions and has been gaining popularity. It allows users to share two or more than two videos at once on a single screen and the best part is that their audio can be customized in an entertaining way. If you are new to the split-screen concept then here are few interesting things to know, keep reading.
- Definition of Facebook Live Split Screen Stream
- Split Screen Requirements
- How to set up Facebook Live Split Screen
- How to Make Split-Screen Video with Wondershare Filmora and Upload to Facebook
What is Facebook Live Split Screen Stream?
Facebook Live feature is activated now and probably you might have planned lots of stuff to stream here directly. That’s great! It will help you to call your friends live chat and you will also be able to organize business meetings over here. Wow! It is really going to revolutionize digital media. Now we can conduct employee meetings with Facebook live chat or even interviews can be scheduled over here. This tool has so many applications and the awesomeness of results depends upon your creativity.
Split Screen Requirements
Let us discuss the requirements of the split-screen feature. Till now users were able to simply upload videos online and the audience uses to comment over that as per their reactions for the content. But now it is possible to update your current live moments interactively on Facebook so that every viewer can stay engaged with your creative stream. Further, it assists users to share the live screen with someone else over the network. But note that, this feature is currently compatible with iPhone only, no other device can enjoy these live-streamed moments. Probably, android users need to wait for few months to avail of this opportunity. So, if you are ready with your device and know very well about data that you are going to update online then follow the guidelines below:
How to Set Up Facebook Live Split Screen?
If you want to entertain your audience with quality live split content then follow these steps below:
Step 1: First of all you have to open the Facebook application on your iPad or iPhone.
Step 2: Go to the news feed page and that hit the live button over there. This live button is indicated as “What is in Your Mind”.
Step 3: Now update an eye-catching description for your video, it must be engaging enough for users so that they can spend time for your content.
Step 4: Hit the “Go Live” option and your stream will immediately begin online.
Step 5: As soon as your stream is live, you will be able to swipe over it to get different controls at ease. Simply swipe left and it will take you to the viewers count.
Step 6: If you want to add someone else to your split screen video then use the Invite to Go Live button on the screen.
Step 7: Once you are done with your valuable information or entertainment then you can remove the stream from the internet. You can simply use Cross sign to remove your viewers from a stream.
How to Make Split-Screen Video with Wondershare Filmora and Upload to Facebook
Download Mac Version ](https://tools.techidaily.com/wondershare/filmora/download/ )
Technologies have revolutionized these days and now streaming is not bound to one person only rather you can invite your friend on the same stream and share screen with a split-screen option. This Live Split Screen Feature has been recently added to the Facebook platform and it enabled two-person broadcast features even from remote locations. After Live is ended, you can choose to post your video so more people can watch it. But how to create a split-screen video and upload it to Facebook without the Live Split-Screen feature? In the following section, we will show you everything you need to complete a split-screen video and upload it to Facebook directly.
How to Make Split-Screen Videos?
Those who are interested to create a surprising stunning video clip for their Facebook friends are advised to use Filmora Split Screen Video Editor . This application is compatible with Mac as well as Windows platform and follows a user-friendly interface. It offers a wide range of video editing features and results can be customized using transitions or by adding background music effects. The resulting video files can be directly uploaded to Facebook with the desired file format. You will be glad to know that Wondershare Filmora extends support to more than 150 media file formats along with high-resolution video content.
Here are simple steps for creating split-screen videos:
Step 1. Download Wondershare Filmora
First of all, you need to go online and download Filmora Split Screen Video Editor from its official website. Get it installed and launch on your platform. As soon as the software gets started on your system, simply make selections for the desired aspect ratio for your project. Now from the welcome window, make a selection for full feature mode.
Step 2. Import Video
There are two options to import video files to Wondershare Timeline. You can either access them by pressing the Import button from the timeline that helps to bring files directly to the User’s Album. Or the second option is the user-friendly ‘drag and drop’ tools that make everything easier for a beginner.
Step 3. Select Split Screen Preset
You will find the Split Screen button on Wondershare Toolbar. Select this option and it will soon lead you to the library containing numbers of split-screen formats. Out of this big list, you can choose anyone and then drag it to a timeline. If you don’t want to use drag and drop tool then select your present, right-click over it, and then from the drop-down menu select the Apply option. One more option is to choose your present type and then hit the Plus icon available on the lower right portion of the thumbnail.
Step 4. Add videos to Split Screen
Go to the timeline and double click on your recently selected preset. You will find drop zones on your timeline to which videos can be added. Simply drag your video files and drop them in different drop zones as the available one box contains a slider for time adjustments of various videos, users can access it to apply desired timing constraints. One can also add borders to videos from the “Apply Border” option and the best part is that the colors of these borders can be also customized to create unique effects.
Step 5. Video Sound Adjustment
Now as you have added all videos to your split screen, they will naturally start playing at the same time and their audio information will appear like noise. Here you need to apply some trick for sound adjustment so that viewers do not find your content annoying. The best advice is to mute one video at a time and let another play normally. In order to mute a video file, you can simply hit the Mute Track option from Drop Zone. Users can also mute both these videos and add one separate informative file in form of a soundtrack to the split-screen video. You can find such soundtrack files in the built-in media library of Wondershare. Once all soundtrack adjustments are done then hit the OK button to save the changes.
Step 6. Upload Split Screen Video to Facebook
As you are done with all the changes now so it is time to impress your audience. Hit the export button on the Wondershare platform and select the file format for your split-screen video. Use Facebook sign for selection of upload platform and sign in with your account. Add a description and title information and finally hit the Export button.
After the export process is finished, you can click the link or click the Find Target button to check your split-screen video on Facebook.
Or, you can save the video in .mp4 format first and then upload it to your Facebook later. To do so, click the first icon and then select the .mp4 format.
What’s more, you can export the split-screen video to your smartphone or burn it to a DVD collection, or upload it to YouTube and Vimeo.
You may also like: 8 Best Facebook Scheduler>>
How to Create Square Videos for Facebook >>
Facebook Insights: How to Use it for Beginners >>
Shanoon Cox
Shanoon Cox is a writer and a lover of all things video.
Follow @Shanoon Cox
Also read:
- [New] 2024 Approved Bring Forth Forgotten Vids Unlock the Power of These 12 Secrets, FB, 2023
- [New] Discovery Unearthing the Best Videos From FB's Sphere for 2024
- [Updated] In 2024, Engage Viewers with 3 Innovative Description Styles on Instagram Vids
- [Updated] Sparking Social Media Stories Facebook Fame Techniques for 2024
- Beat the Norm with Mac Audio Guide
- Broadcasting Facebook Videos Through Your TV Setup
- How do i add my signature to Word 2010
- How to Screen Mirroring Xiaomi Redmi A2 to PC? | Dr.fone
- In 2024, Optimizing Your FB Profile with Stunning Cover Videos
- Recorder at Zero Free Capture of Your Android Content
- Social Media Archives - Live Version for 2024
- Step-By-Step Guide: Restarting the Dolby Pro Logic IIx Driver on Windows 10
- Unlock Xiaomi Redmi Note 12 4G Phone Password Without Factory Reset Full Guide Here
- Xbox 360 Gamepad Driver Downloads: Compatible Drivers & Installation Guide
- Title: [New] Streamlining Social Interaction via Multi-View Broadcasting in Facebook
- Author: James
- Created at : 2025-02-27 16:50:12
- Updated at : 2025-03-05 18:27:57
- Link: https://facebook-clips.techidaily.com/new-streamlining-social-interaction-via-multi-view-broadcasting-in-facebook/
- License: This work is licensed under CC BY-NC-SA 4.0.