
In 2024, Navigating Facebook for UHD (1080P) Content
Navigating Facebook for UHD (1080P) Content
Facebook Video Maker - Wondershare Filmora
Provide abundant video effects - A creative video editor
Powerful color correction and grading
Detailed tutorials provided by the official channel
Live streams have been around the corner for a while. Many content creators have taken live streaming to another level and innovated multiple elements within them. To cater to the ideas of these creators, different social media platforms came up with multiple developments within their streaming systems. Facebook has been working on its live streaming feature for a while, providing several innovations to work with.
As content creators look for different tools and intuitive platforms to work across their live streams, they also look for quality within the output of their video. Facebook has been striving to achieve the status of providing 1080p HD streaming across its platform. Being a new creator, you may look for the direction to achieve HD quality across your streams. This article directs readers to a guide on how to stream 1080p Facebook without any glitches.
In this article
Part 1: How to Enable A Facebook HD 1080p Stream?
Part 2: How to Schedule A Facebook HD 1080p Stream?
Part 3: Add Polls to Facebook 1080p Stream
Part 4: Add Thumbnail to Facebook 1080p Stream

Part 1: How to Enable A Facebook HD 1080p Stream?
Facebook 1080p stream provides content creators with an avenue of excellence. This potentially helps them feature exceptional results across their stream and keep their viewers happy with the quality that is being prospectively displayed across it. However, before creators lead towards their stream, an essential requirement needs to be looked into.
Streaming in HD is only possible if the user sends 1080p from their side. If, by any chance, the stream is 720p, Facebook would be unable to provide 1080p quality across its output. Uniformity is extremely important before guiding towards quality. Facebook allows users to select their choice for the live streaming software. Although the platform can be directly utilized for this purpose, several other software is supported throughout the live stream.
Users can consider using OBS Studio, Wirecast, or XSplit to cater to their streaming requirements. Facebook allows its users to consider any of the software mentioned above for their purpose. For going into a live stream, the user can consider going from a profile, Facebook page, group, or event. With diversity in selecting the source for going live, users can consider going live by sharing their screen, game, or external camera as the video resource.
Before going to stream 1080p Facebook, you might need to enable stream settings for your account. To carry this out, you are advised to look into the following steps in detail.
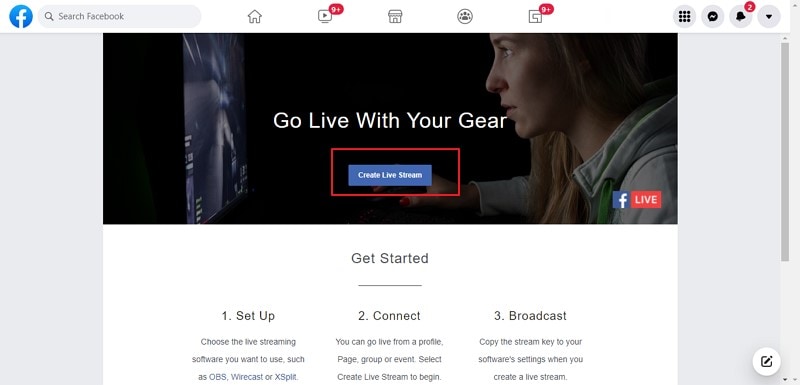
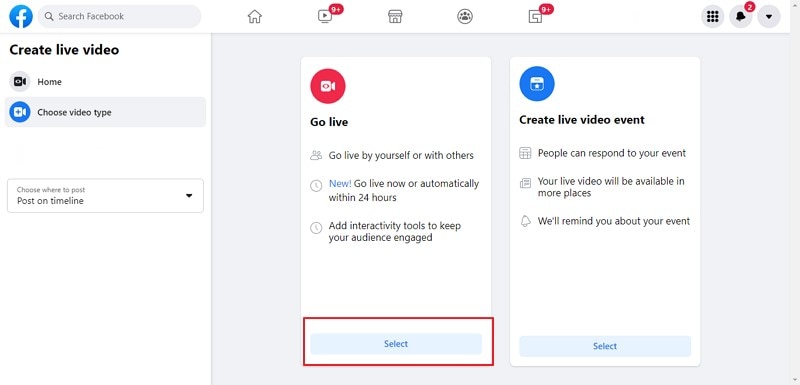
Step 1: Start by going to the following link https://www.facebook.com/live/create . Proceed by clicking on “Create Live Stream” to move into the Live Stream options of Facebook. Now, select the option of “Go Live.”
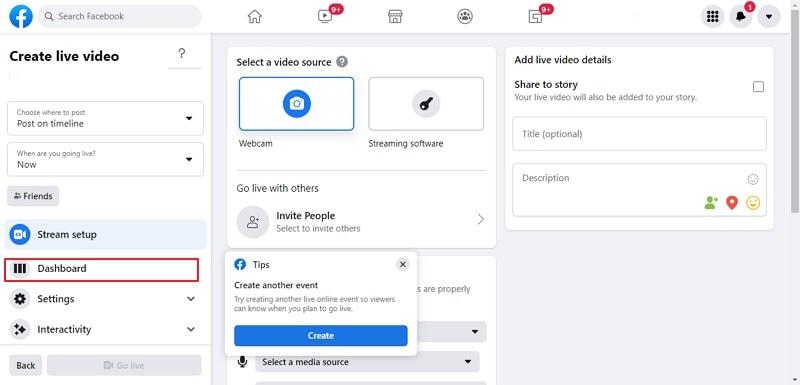
Step 2: On opening the dashboard, you may need to select the source for the video. Considering you are going to stream from another software, tap on the “Streaming Software” option. You can find the “Stream Key” across the option.
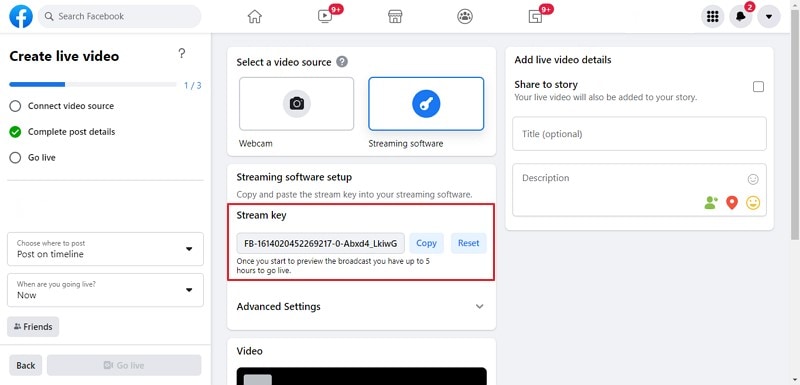
Step 3: On clicking the “Advanced settings” option, a drop-down appears showing the “Server URL” for the stream.

Step 4: As you obtain these keys and URLs for the stream, you need to proceed with the settings for the stream in your streaming software. Initially, you are advised to set the Encoder Settings for your stream. Set the ‘Rate Control’ to CB4, ‘Keyframe Interval’ to 2, and ‘B-frames’ to 3 for optimum results.
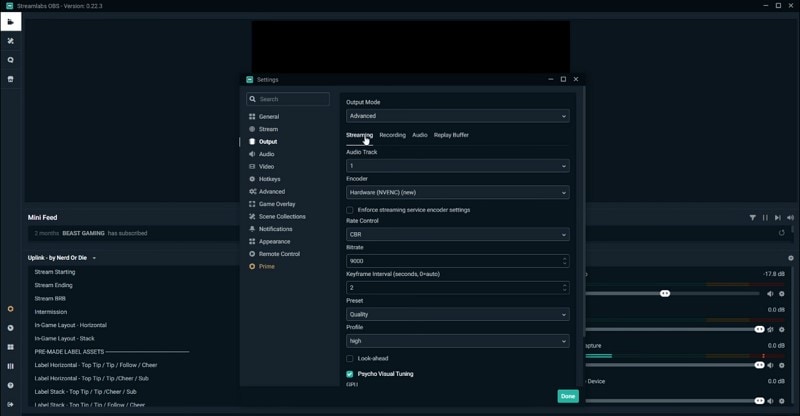
Step 5: Before starting the stream, you need to select the 1080p options within the video quality for the stream. Set up the bitrate according to your setup through experimentation. Once done, your streaming is enabled, which can be started whenever desired.

Part 2: How to Schedule A Facebook HD 1080p Stream?
There are times that you set up a stream with different content creators, as in a cameo. While setting up such an event, you need to be very strict to the timings bringing up the stream to the real world. Under such circumstances, Facebook provides scheduling a Facebook 1080p stream for the viewers.
Under certain circumstances, you may feel like setting up a scheduled live stream across Facebook due to your tight schedule. To avoid any discrepancies, you can work across your live stream long before its actual time. To understand how to stream 1080p Facebook with calibrated settings, schedule your stream across Facebook by following the steps as shown below.
Step 1: You need to log in with your Facebook account across your browser to stream your content. Once logged in, tap on the “What’s on your mind, ****“? Option on the top of the News Feed.
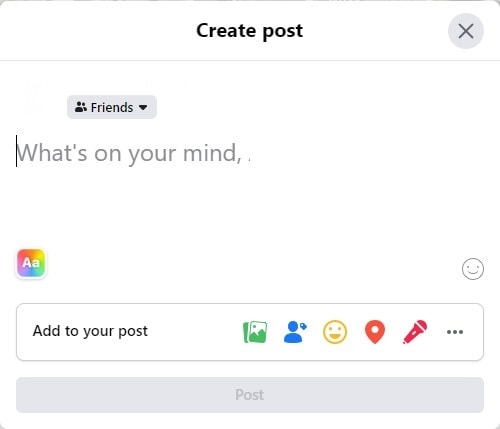
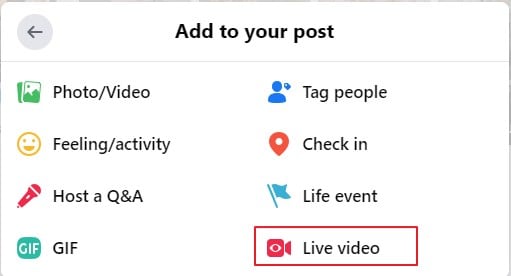
Step 2: This opens up a new window on the screen. Select the “three-dotted icon” on the bottom of the window to proceed. Select “Live Video” from the available options. This leads you to a new window.
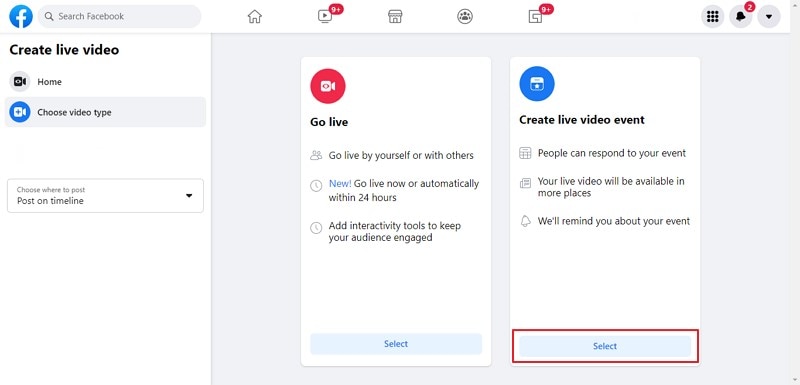
Step 3: On the new screen, you need to select the option of “Create Live Video Event” to set up a scheduled stream on your account.
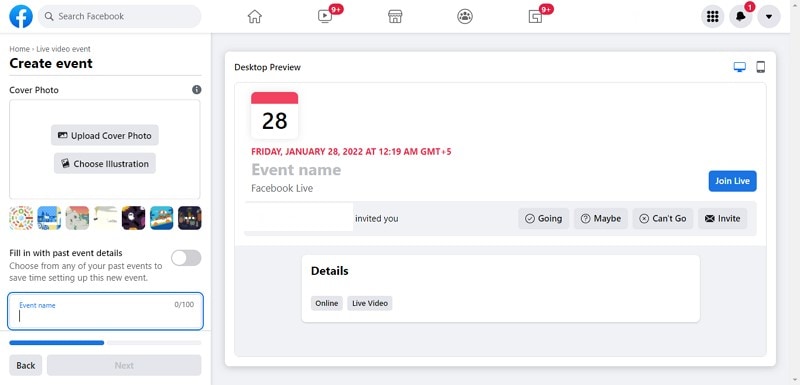
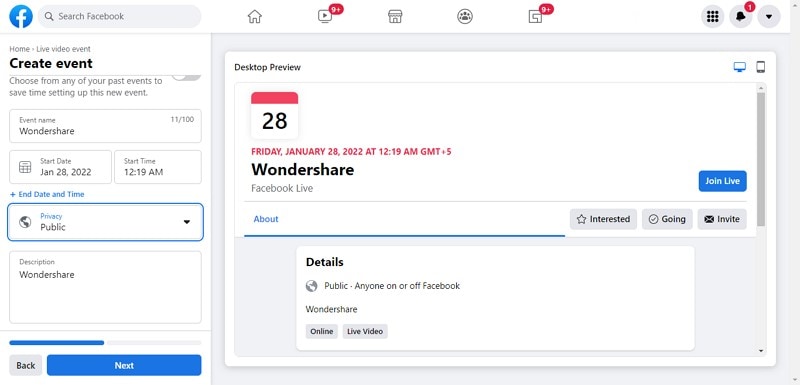
Step 4: The next window allows you to set up the stream settings as desired. Get started by setting up the preview of the stream. Add the cover photo by clicking on the “Upload Cover Photo” or “Choose Illustration.” Provide the name of the event, the starting date, and time along with the privacy settings for the stream. Add a clear description for the stream to conclude setting up the stream settings.
Step 5: Tap “Next” to proceed into the personalized settings of the stream. Set up the event settings, stream settings, and distribution of the scheduled event. Conclude by clicking on the “Create Event” button.
Part 3: Add Polls to Facebook 1080p Stream
Facebook 1080p stream provides a diverse set of options to the creators. While managing the quality of the stream, they can control their viewers with a consistent touch of connected elements. One such element is the use of polls across the stream. Polls are believed to be an interactive element for connecting with viewers. This is why it is quite common among creators who consider using Facebook to stream their videos.
Polls can help you make significant improvements in the stream. However, you need to set up the appropriate poll that would be inciteful to the viewers. Setting up polls is not a difficult process as a whole. Users looking to set up a poll across their stream should look into the steps featured below.
Step 1: To create a live poll across your stream, you need to follow the following link: https://www.facebook.com/live/producer/ . Now, click on the option of “Go Live.”
Step 2: On opening this “Go Live,” you would be redirected across your stream and the controlling platform. Select the “Dashboard” across the left-handed column.
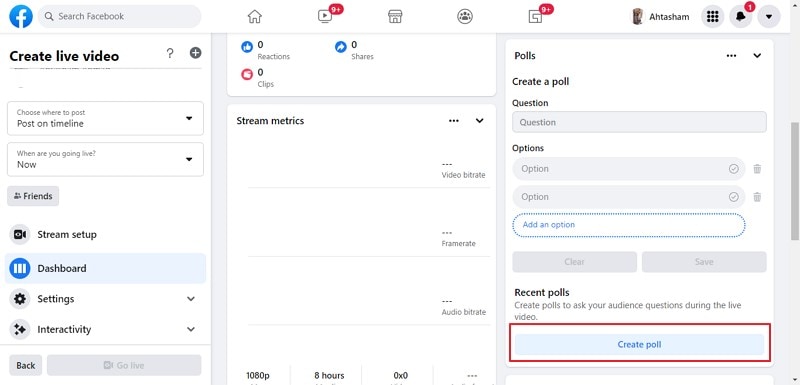
Step 3: This opens a set of different interactive tools across the platform. Select “Polls” from the options and set up a poll question along with the options as required. Once created, tap on “Create Poll” to set it up across the preview of the live video.
Part 4: Add Thumbnail to Facebook 1080p Stream
People who consider to stream 1080p Facebook for designing creative content have to ensure the consistency of every element that is involved in the stream. While covering the quality of the stream, the users have to look into several other elements which are equally important to allure viewers into looking across the stream.
Thumbnails provide an idea to the viewers on the genre of the live stream that the content creator is featuring. This is why it is considered important across any live stream. Before setting up a thumbnail, there are certain limitations provided by Facebook for the streamers. The platform allows uploading JPEG or PNG as a thumbnail across the video. Along with that, it needs to be less than 3MB in size.
Users who wish to add a thumbnail across their stream must follow the steps explained below.
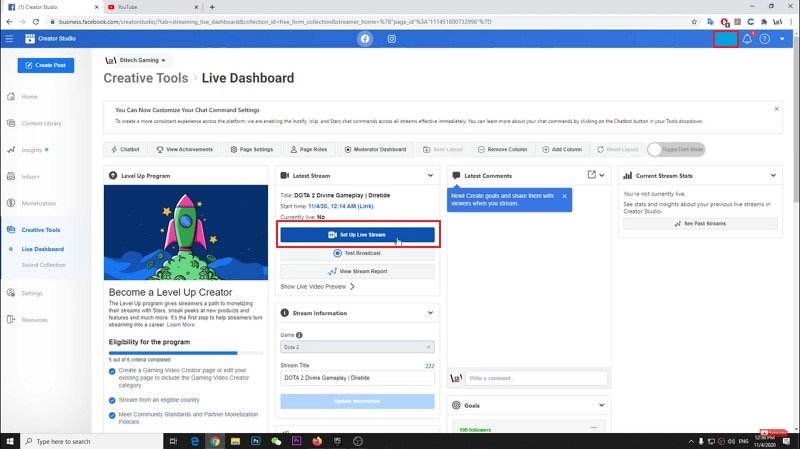
Step 1: You need to direct yourself into the Creator Studio to go through the settings of your stream. Lead to the “Creative Tools” section from the left-hand panel and select “Set Up Live Stream” from the window featured on the front.
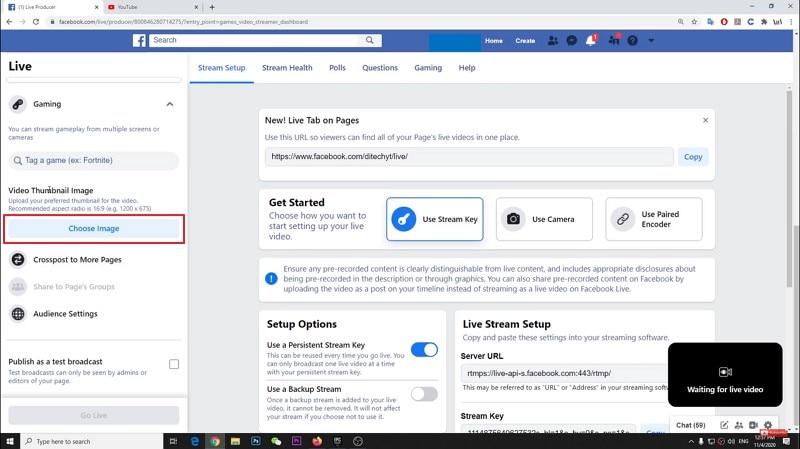
Step 2: This opens up the live stream settings on a new screen. On the new screen, you are advised to scroll down on the left-hand column and find the option of “Video Thumbnail Image.” Select “Choose Image” and import the thumbnail photo.Now, tap on the “Go Live” button to start your live streaming.
This article has featured a detailed discussion on how to stream 1080p Facebook videos across the platform. Content creators who face difficulty working through the stream can look into the discussion to retain information on making quality live streams across their channels. To look better than the rest, follow the different steps as advised above to make your streams interactive and connected.
Live streams have been around the corner for a while. Many content creators have taken live streaming to another level and innovated multiple elements within them. To cater to the ideas of these creators, different social media platforms came up with multiple developments within their streaming systems. Facebook has been working on its live streaming feature for a while, providing several innovations to work with.
As content creators look for different tools and intuitive platforms to work across their live streams, they also look for quality within the output of their video. Facebook has been striving to achieve the status of providing 1080p HD streaming across its platform. Being a new creator, you may look for the direction to achieve HD quality across your streams. This article directs readers to a guide on how to stream 1080p Facebook without any glitches.
In this article
Part 1: How to Enable A Facebook HD 1080p Stream?
Part 2: How to Schedule A Facebook HD 1080p Stream?
Part 3: Add Polls to Facebook 1080p Stream
Part 4: Add Thumbnail to Facebook 1080p Stream
Part 1: How to Enable A Facebook HD 1080p Stream?
Facebook 1080p stream provides content creators with an avenue of excellence. This potentially helps them feature exceptional results across their stream and keep their viewers happy with the quality that is being prospectively displayed across it. However, before creators lead towards their stream, an essential requirement needs to be looked into.
Streaming in HD is only possible if the user sends 1080p from their side. If, by any chance, the stream is 720p, Facebook would be unable to provide 1080p quality across its output. Uniformity is extremely important before guiding towards quality. Facebook allows users to select their choice for the live streaming software. Although the platform can be directly utilized for this purpose, several other software is supported throughout the live stream.
Users can consider using OBS Studio, Wirecast, or XSplit to cater to their streaming requirements. Facebook allows its users to consider any of the software mentioned above for their purpose. For going into a live stream, the user can consider going from a profile, Facebook page, group, or event. With diversity in selecting the source for going live, users can consider going live by sharing their screen, game, or external camera as the video resource.
Before going to stream 1080p Facebook, you might need to enable stream settings for your account. To carry this out, you are advised to look into the following steps in detail.
Step 1: Start by going to the following link https://www.facebook.com/live/create . Proceed by clicking on “Create Live Stream” to move into the Live Stream options of Facebook. Now, select the option of “Go Live.”
Step 2: On opening the dashboard, you may need to select the source for the video. Considering you are going to stream from another software, tap on the “Streaming Software” option. You can find the “Stream Key” across the option.
Step 3: On clicking the “Advanced settings” option, a drop-down appears showing the “Server URL” for the stream.
Step 4: As you obtain these keys and URLs for the stream, you need to proceed with the settings for the stream in your streaming software. Initially, you are advised to set the Encoder Settings for your stream. Set the ‘Rate Control’ to CB4, ‘Keyframe Interval’ to 2, and ‘B-frames’ to 3 for optimum results.
Step 5: Before starting the stream, you need to select the 1080p options within the video quality for the stream. Set up the bitrate according to your setup through experimentation. Once done, your streaming is enabled, which can be started whenever desired.
Part 2: How to Schedule A Facebook HD 1080p Stream?
There are times that you set up a stream with different content creators, as in a cameo. While setting up such an event, you need to be very strict to the timings bringing up the stream to the real world. Under such circumstances, Facebook provides scheduling a Facebook 1080p stream for the viewers.
Under certain circumstances, you may feel like setting up a scheduled live stream across Facebook due to your tight schedule. To avoid any discrepancies, you can work across your live stream long before its actual time. To understand how to stream 1080p Facebook with calibrated settings, schedule your stream across Facebook by following the steps as shown below.
Step 1: You need to log in with your Facebook account across your browser to stream your content. Once logged in, tap on the “What’s on your mind, ****“? Option on the top of the News Feed.

Step 2: This opens up a new window on the screen. Select the “three-dotted icon” on the bottom of the window to proceed. Select “Live Video” from the available options. This leads you to a new window.

Step 3: On the new screen, you need to select the option of “Create Live Video Event” to set up a scheduled stream on your account.
Step 4: The next window allows you to set up the stream settings as desired. Get started by setting up the preview of the stream. Add the cover photo by clicking on the “Upload Cover Photo” or “Choose Illustration.” Provide the name of the event, the starting date, and time along with the privacy settings for the stream. Add a clear description for the stream to conclude setting up the stream settings.
Step 5: Tap “Next” to proceed into the personalized settings of the stream. Set up the event settings, stream settings, and distribution of the scheduled event. Conclude by clicking on the “Create Event” button.
Part 3: Add Polls to Facebook 1080p Stream
Facebook 1080p stream provides a diverse set of options to the creators. While managing the quality of the stream, they can control their viewers with a consistent touch of connected elements. One such element is the use of polls across the stream. Polls are believed to be an interactive element for connecting with viewers. This is why it is quite common among creators who consider using Facebook to stream their videos.
Polls can help you make significant improvements in the stream. However, you need to set up the appropriate poll that would be inciteful to the viewers. Setting up polls is not a difficult process as a whole. Users looking to set up a poll across their stream should look into the steps featured below.
Step 1: To create a live poll across your stream, you need to follow the following link: https://www.facebook.com/live/producer/ . Now, click on the option of “Go Live.”
Step 2: On opening this “Go Live,” you would be redirected across your stream and the controlling platform. Select the “Dashboard” across the left-handed column.
Step 3: This opens a set of different interactive tools across the platform. Select “Polls” from the options and set up a poll question along with the options as required. Once created, tap on “Create Poll” to set it up across the preview of the live video.
Part 4: Add Thumbnail to Facebook 1080p Stream
People who consider to stream 1080p Facebook for designing creative content have to ensure the consistency of every element that is involved in the stream. While covering the quality of the stream, the users have to look into several other elements which are equally important to allure viewers into looking across the stream.
Thumbnails provide an idea to the viewers on the genre of the live stream that the content creator is featuring. This is why it is considered important across any live stream. Before setting up a thumbnail, there are certain limitations provided by Facebook for the streamers. The platform allows uploading JPEG or PNG as a thumbnail across the video. Along with that, it needs to be less than 3MB in size.
Users who wish to add a thumbnail across their stream must follow the steps explained below.
Step 1: You need to direct yourself into the Creator Studio to go through the settings of your stream. Lead to the “Creative Tools” section from the left-hand panel and select “Set Up Live Stream” from the window featured on the front.
Step 2: This opens up the live stream settings on a new screen. On the new screen, you are advised to scroll down on the left-hand column and find the option of “Video Thumbnail Image.” Select “Choose Image” and import the thumbnail photo.Now, tap on the “Go Live” button to start your live streaming.
Conclusion
This article has featured a detailed discussion on how to stream 1080p Facebook videos across the platform. Content creators who face difficulty working through the stream can look into the discussion to retain information on making quality live streams across their channels. To look better than the rest, follow the different steps as advised above to make your streams interactive and connected.
Live streams have been around the corner for a while. Many content creators have taken live streaming to another level and innovated multiple elements within them. To cater to the ideas of these creators, different social media platforms came up with multiple developments within their streaming systems. Facebook has been working on its live streaming feature for a while, providing several innovations to work with.
As content creators look for different tools and intuitive platforms to work across their live streams, they also look for quality within the output of their video. Facebook has been striving to achieve the status of providing 1080p HD streaming across its platform. Being a new creator, you may look for the direction to achieve HD quality across your streams. This article directs readers to a guide on how to stream 1080p Facebook without any glitches.
In this article
Part 1: How to Enable A Facebook HD 1080p Stream?
Part 2: How to Schedule A Facebook HD 1080p Stream?
Part 3: Add Polls to Facebook 1080p Stream
Part 4: Add Thumbnail to Facebook 1080p Stream
Part 1: How to Enable A Facebook HD 1080p Stream?
Facebook 1080p stream provides content creators with an avenue of excellence. This potentially helps them feature exceptional results across their stream and keep their viewers happy with the quality that is being prospectively displayed across it. However, before creators lead towards their stream, an essential requirement needs to be looked into.
Streaming in HD is only possible if the user sends 1080p from their side. If, by any chance, the stream is 720p, Facebook would be unable to provide 1080p quality across its output. Uniformity is extremely important before guiding towards quality. Facebook allows users to select their choice for the live streaming software. Although the platform can be directly utilized for this purpose, several other software is supported throughout the live stream.
Users can consider using OBS Studio, Wirecast, or XSplit to cater to their streaming requirements. Facebook allows its users to consider any of the software mentioned above for their purpose. For going into a live stream, the user can consider going from a profile, Facebook page, group, or event. With diversity in selecting the source for going live, users can consider going live by sharing their screen, game, or external camera as the video resource.
Before going to stream 1080p Facebook, you might need to enable stream settings for your account. To carry this out, you are advised to look into the following steps in detail.
Step 1: Start by going to the following link https://www.facebook.com/live/create . Proceed by clicking on “Create Live Stream” to move into the Live Stream options of Facebook. Now, select the option of “Go Live.”
Step 2: On opening the dashboard, you may need to select the source for the video. Considering you are going to stream from another software, tap on the “Streaming Software” option. You can find the “Stream Key” across the option.
Step 3: On clicking the “Advanced settings” option, a drop-down appears showing the “Server URL” for the stream.
Step 4: As you obtain these keys and URLs for the stream, you need to proceed with the settings for the stream in your streaming software. Initially, you are advised to set the Encoder Settings for your stream. Set the ‘Rate Control’ to CB4, ‘Keyframe Interval’ to 2, and ‘B-frames’ to 3 for optimum results.
Step 5: Before starting the stream, you need to select the 1080p options within the video quality for the stream. Set up the bitrate according to your setup through experimentation. Once done, your streaming is enabled, which can be started whenever desired.
Part 2: How to Schedule A Facebook HD 1080p Stream?
There are times that you set up a stream with different content creators, as in a cameo. While setting up such an event, you need to be very strict to the timings bringing up the stream to the real world. Under such circumstances, Facebook provides scheduling a Facebook 1080p stream for the viewers.
Under certain circumstances, you may feel like setting up a scheduled live stream across Facebook due to your tight schedule. To avoid any discrepancies, you can work across your live stream long before its actual time. To understand how to stream 1080p Facebook with calibrated settings, schedule your stream across Facebook by following the steps as shown below.
Step 1: You need to log in with your Facebook account across your browser to stream your content. Once logged in, tap on the “What’s on your mind, ****“? Option on the top of the News Feed.
Step 2: This opens up a new window on the screen. Select the “three-dotted icon” on the bottom of the window to proceed. Select “Live Video” from the available options. This leads you to a new window.
Step 3: On the new screen, you need to select the option of “Create Live Video Event” to set up a scheduled stream on your account.
Step 4: The next window allows you to set up the stream settings as desired. Get started by setting up the preview of the stream. Add the cover photo by clicking on the “Upload Cover Photo” or “Choose Illustration.” Provide the name of the event, the starting date, and time along with the privacy settings for the stream. Add a clear description for the stream to conclude setting up the stream settings.
Step 5: Tap “Next” to proceed into the personalized settings of the stream. Set up the event settings, stream settings, and distribution of the scheduled event. Conclude by clicking on the “Create Event” button.
Part 3: Add Polls to Facebook 1080p Stream
Facebook 1080p stream provides a diverse set of options to the creators. While managing the quality of the stream, they can control their viewers with a consistent touch of connected elements. One such element is the use of polls across the stream. Polls are believed to be an interactive element for connecting with viewers. This is why it is quite common among creators who consider using Facebook to stream their videos.
Polls can help you make significant improvements in the stream. However, you need to set up the appropriate poll that would be inciteful to the viewers. Setting up polls is not a difficult process as a whole. Users looking to set up a poll across their stream should look into the steps featured below.
Step 1: To create a live poll across your stream, you need to follow the following link: https://www.facebook.com/live/producer/ . Now, click on the option of “Go Live.”
Step 2: On opening this “Go Live,” you would be redirected across your stream and the controlling platform. Select the “Dashboard” across the left-handed column.
Step 3: This opens a set of different interactive tools across the platform. Select “Polls” from the options and set up a poll question along with the options as required. Once created, tap on “Create Poll” to set it up across the preview of the live video.
Part 4: Add Thumbnail to Facebook 1080p Stream
People who consider to stream 1080p Facebook for designing creative content have to ensure the consistency of every element that is involved in the stream. While covering the quality of the stream, the users have to look into several other elements which are equally important to allure viewers into looking across the stream.
Thumbnails provide an idea to the viewers on the genre of the live stream that the content creator is featuring. This is why it is considered important across any live stream. Before setting up a thumbnail, there are certain limitations provided by Facebook for the streamers. The platform allows uploading JPEG or PNG as a thumbnail across the video. Along with that, it needs to be less than 3MB in size.
Users who wish to add a thumbnail across their stream must follow the steps explained below.
Step 1: You need to direct yourself into the Creator Studio to go through the settings of your stream. Lead to the “Creative Tools” section from the left-hand panel and select “Set Up Live Stream” from the window featured on the front.
Step 2: This opens up the live stream settings on a new screen. On the new screen, you are advised to scroll down on the left-hand column and find the option of “Video Thumbnail Image.” Select “Choose Image” and import the thumbnail photo.Now, tap on the “Go Live” button to start your live streaming.
Conclusion
This article has featured a detailed discussion on how to stream 1080p Facebook videos across the platform. Content creators who face difficulty working through the stream can look into the discussion to retain information on making quality live streams across their channels. To look better than the rest, follow the different steps as advised above to make your streams interactive and connected.
- Title: In 2024, Navigating Facebook for UHD (1080P) Content
- Author: James
- Created at : 2024-07-19 01:16:52
- Updated at : 2024-07-20 01:16:52
- Link: https://facebook-clips.techidaily.com/in-2024-navigating-facebook-for-uhd-1080p-content/
- License: This work is licensed under CC BY-NC-SA 4.0.